
Optimisation is, without a doubt, the most commonly raised issue I’ve assisted clients with. I may not be a data scientist, but common sense dictates if a site has a bad user experience, then there’s a risk of those users dropping off and studies have regularly shown that poorly performing websites do not convert customers. You can read this article from Akamai which indicates a delay of two seconds can increase bounce rates by 103% which is quite significant.
I’m tired of sending emails to people that read as “check out this article but ignore steps 3-6, then look at the top of this one, and after that check this out” so I’ve decided to just write my own article where I can impart a distilled version of my process for optimising a WordPress install using only free tools and in, what I hope at least, is an easy to follow step-by-step format.
Table of Contents
Avenues of Optimisation
The first thing to do when optimising a WordPress site is to find avenues of optimisation which essentially means, find out what part of the site is performing poorly and fix it! If you’ve explored every avenue of optimisation, corrected any issues and the site is still performing poorly then it’s time to take a different approach.
Regardless of which way you choose to identify problems, there are a number of common things you should always be checking when optimising!
- Software versions
- Plugin and theme configurations
- Caching
- Image optimisation
- CSS/JS/HTML Minification
- Database optimisation
- Traffic control
- CDN usage
If you haven’t optimised the site previously, I’d recommend going through each of these steps in order for the best possible result and make sure to test the site between each one.
Test the Site’s Performance
The first thing we need to do is to test the site and find out what aspect is performing poorly. Everyone has their own preferred methods of doing this and there are definitely pro’s and con’s to each:
Online testing tools such as GTMetrix, WEBPAGETEST, Pingdom Tools or PageSpeed Insights offer suggestions on ways to improve your site and so are great for beginners or anyone without access to the server the site is hosted on. It’s really important to understand though, that the ranking these sites use is effectively arbitrary. They present a score based on perceived speeds as opposed to actual speeds. For example, let’s look at starwars.com, it’s a professionally built site that loads just fine when browsing as an actual user buuuutttt….

That’s not to say page speed testers are useless, it’s just important to highlight that you’re looking at parsed data that may have been interpreted poorly! If you do decide to use a speed testing tool, make sure you use the same one throughout testing.
Use a plugin like Query Monitor to test performance right from the WordPress dashboard. It’s a little more involved than a page tester as there are no suggestions but it does give you a far more intimate look at what components of the site are struggling. If you’d like to learn more about Query Monitor, you can follow the guide found here.
Troubleshoot using the CLI. I’m a massive fan of command-line interfaces and there is no substitute in my eyes for debugging or testing directly on a server. I don’t believe I could impart the knowledge requited to troubleshoot a site from the command-line interface in one article so for now, you’ll have to make do with external research I’m afraid.
Software Versions
Like any piece of technology, you want to make sure that your different software components can communicate with each other effectively. Have you ever tried to plug a SNES into a 4K Ultra-wide? You’re gonna have a bad time. There is an argument that newer is not necessarily better but when it comes to WordPress (and websites in general), outdated software usually comes with security flaws so it is always best practice to ensure you are running the latest version of your software.
There are four main components you should be worried about as the site owner and a handful more than that, that you’re hosting company should be worried about.
WordPress Core

If you’re using an outdated version, WordPress will notify you with a banner and in the “Updates” section of your dashboard. You can also find the version in the bottom right hand corner of the wp-admin page, by reading the wp-includes/version.php file if you prefer (S)FTP or the wp core version command if you prefer SSH. You should always make sure your website has the most current version of WordPress installed as it forms the foundation of your site.
Plugins and Themes
Now that you have the latest WordPress version, you should also make sure you’re using the latest version for each of your plugins and themes. While WordPress will notify you of new plugin and theme versions, there a few caveats and pitfalls with this that can sometimes trip people up a little bit.
- Premium plugins and themes are NOT stored in the WordPress repository, this means that the WordPress Updates dashboard won’t know when they are available!
- Some plugins and themes have not been updated in quite some time and are considered “abandonware” as there is no indication that the developer(s) have any intention of carrying on the project. While they may still be available on wordpress.org, there will be no notification on your site to tell you that there have been no updates for them!
Remember; It’s up to you to maintain your plugins and themes and you should expect to reach a point where it no longer makes sense to keep some of them. The one downside of using open source software is that if you don’t know how to code it, then you can’t depend on it receiving constant updates!
PHP
PHP is the coding language that WordPress is built upon along with HTML, CSS and JavaScript. A new version is (normally) released each year and they are all actively supported for two years beyond that. After the active support period ends, each version get’s another year of security fixes. You can see the currently supported versions here. Many hosts leave the control over PHP versions in the hands of the customer and you should check your hosting companies knowledge base for instructions on how to change it. Keep in mind that some hosting companies will ask that you contact them for any PHP version changes, however!
What should I ask my hosting company?
The WordPress and PHP software installed on your server is not the only thing that contributes to performance however, and there are things that can contribute to poor performance outside of your control:
- Operating System! While it’s definitely not necessary to be using the most up to date operating systems for a web server, make sure your site is not hosted on a machine running anything older than five years.
- Apache or NGINX is the most likely web server software running on the machine your site is hosted on, so be sure to ask which version your host is using and check that against version controls. If it’s particularly outdated, don’t be afraid to ask for an upgrade as many hosts will have different images available and it may simply be that you’re using an old flavour due to when you signed up!
- There are a number of technologies which house your database, such as MySQL or MariaDB. There are pro’s and con’s to each, but most hosting companies pick one and stick with it so it’s rare to have to opportunity to interchange which system is in use. As before, the main thing here is to simply ensure your site is using a modern version!
Plugin and Theme Configurations
Now that you’re sure everything is running on modern technology, it’s time to make sure your plugins and theme are configured efficiently. It’s difficult to write for this section as every plugin serves a different purpose and each theme has different options but there are some general guidelines to follow which should apply to everyone.
Uninstall redundant plugins
I often come across sites with substantially more plugins than are necessary, I think the record I’ve seen was 148 but I would not be surprised to see even more eventually. Granted, each plugin serves a particular function, but when it comes to optimising a site, it’s important to trim the fat. For example, I once worked on a site with four backup plugins regularly scanning the site and the hosting company took daily backups on top of that! Actions like this are completely unnecessary and have an adverse effect on performance.
There are some plugins which perform multiple functions and it’s important to make sure you’re not “doubling up” on anything. For example, Jetpack is an incredibly powerful and popular plugin with a lot of features including image optimisation. If you’re using Jetpack and also using a dedicated image optimisation plugin, make sure they don’t do the same thing. If they do, test your site performance with each one active and compare the results to help decide which is worth keeping and which is not pulling its weight. It’s also worth testing performance with both active but the dedicated functions turned off on the multi-functional plugin (in the above example, that would mean leave both plugins active but turn off all image optimisation included with Jetpack).
Take a good hard look at your theme
There are a lot of themes out there (particularly premium ones) that come with a lot of bells and whistles. That’s great if you want a feature-rich site, but it’s not so great if you want a high-performance site. For example, Newspaper is a feature-rich theme intended for use by article heavy sites, but take a look at their minimum requirements page. The developers themselves have stated that if you expect more than 4,000 visitors a day, you’re going to need a VPS with more than 4GB of RAM which is staggeringly high. In contrast, many hosting companies load-test native WordPress installs (meaning a default theme) on their platforms as part of the WordPress Hosting Community and I have seen reports which would equate to about 32,000 visitors a day on a 4GB machine. When optimising a WordPress site, testing performance with a default theme active is paramount so an effective benchmark can be set.
Compatibility
Sometimes you can have two functions that work perfectly fine on their own but when combined, can bring your site to it’s needs. As a use case think of a plugin that defers the parsing of your javascript. This means that the JS files will be called only after the rest of your content is visible so visitors get a quicker paint. Now combine that with an image slider that needs a JS to function and a lazy loader that won’t call your images until they’re needed. The JS deferral and lazy loading are both excellent features that make most sites much quicker but in this case, they are at odds with each other due to the image slider. This would either not load the images at all or, the site would load substantially longer than it needs too due until one function gives up and times out!
Image Optimisation
One of the most obvious ways to optimise a website is to reduce the size of the content, and one of largest components of website content is images. Images are prevalent everywhere in digital media and are used as backgrounds, icons, features images, calls to action and avatars to name but a few. On the web, this can really add up and if site owners aren’t careful, simple landing pages can end up in the 6MB to 10MB range, which is far from ideal. Luckily, however, there are a number of ways to optimise your images to prevent bloat without impacting the discernible quality of your site.
Filetype
The first thing to consider is what file type to use for your image. This will change depending on the purpose of the image but for most users there are 4 main options; JPG, PNG, GIF, and SVG with a bonus round 5th option in WEBP.
JPG
I like to think of JPG as the default image type when working on a site. They use lossy compression which means that some quality is lost but the overall size (in KB) reduction tends to be much greater than our other options. JPG’s are particularly useful for photographs as they support 16 million colours and tend to be reduced in scale so much that they can afford to drop substantially in quality.
PNG
Similar to JPG files, PNG-24 files tend to be used for highly detailed images like photographs but they use lossless compression so will almost always be much larger than their JPG counterparts. I would only recommend these for professional photographers where the image itself (as opposed to the image content or subject) is crucially important. They also support transparency if required.
GIF
I’m not a fan of using GIF files on a site personally but they definitely have their uses. They support only 256 colours so are much smaller and of lower quality than a JPG but they do support animation which has become their main use case in recent times. If using an animated GIF, however, users should be very cautious of the size (in KB) of the image as they can easily bloat a homepage and cause severe performance issues.
SVG
SVG files are vector based graphics and so can be scaled to any size without a loss in quality. Vector images however can become incredibly bloated the more detailed they become, so I would only really recommend them for logos or icons.
WEBP
WebP is a modern format created by Google and has gained a lot of traction in the past few years. It supports lossy and lossless compression, animation, transparency, generally produces much more compact files, and is quickly becoming the staple of the web image formats. Unfortunately though, it has not yet been fully adopted by every browser so if you’re only using webp, your images can fail to load for some visitors. This problem can be corrected with redirects or HTML tags but the most accessible way to avail of WebP is to use one of the plugins mentioned in this article. Do keep in mind that not all hosting servers can convert to WebP so you may need to either serve your images from a CDN (Like the JetPack method) or convert them locally and upload them to your media library.
Size and Scale
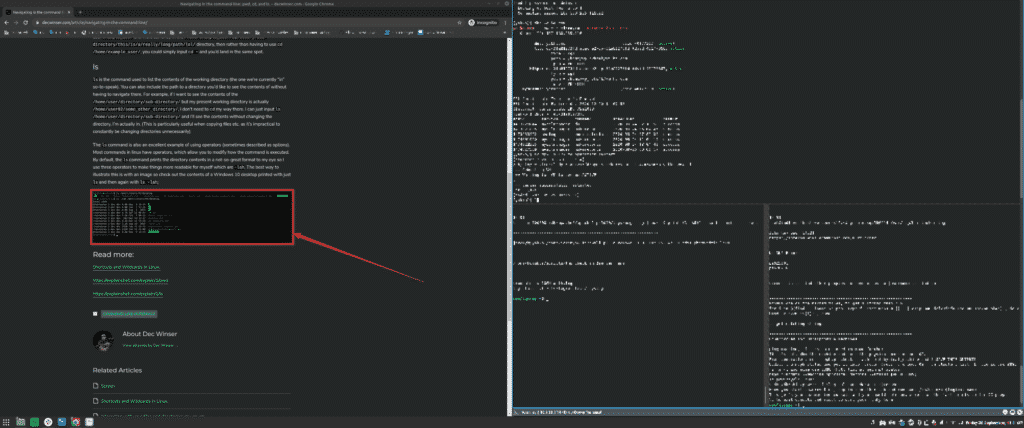
Normally when we mention size in the context of a website, we’re talking about the size of the data being loaded. When it comes to images, however, we also need to think of the scale of the image or the size of the canvas, so to speak. For example, I love to take photographs on my DSLR and it has the option to save these as JPGs for me. That’s great on paper but when checking the image properties of my last photo, I can see the size of the image is 5.4MB and the scale is 6000×3376 which is not something I would ever want on my website. Before uploading images to the web, consider a practical use case and resize the image using a tool like GIMP to manually resize the image. To put that in context, I use an Ultrawide monitor which is 3440×1440 and as it’s so wide, my browser only ever occupies one half of the screen. Therefore in the example below, for a large monitor user like myself, the image highlighted in red, doesn’t need to be anything more than about 750×200(ish). This is particularly important if you’re building a mobile site where you would expect visitors to have tiny screens and want very small data transfers.
Plugins
There are a lot of plugins available out there when it comes to Image Optimisation and depending on who you talk to, everyone is going to have a different recommendation. For me personally, there are only really two options I recommend. The first is a very hands off approach and effectively, pushes your images to a CDN, resizes them when needed (never up though) and serves them in the WEBP format if the visitors browser allows for it. It also has an included Lazy Loading option which I’ll get into below. Enter Jetpack’s Site Accelerator. There’s really not much more to say about Jetpack’s site accelerator other than it’s both free, works incredibly well and you should definitely use it.
If however, you prefer a little more control, I’d recommend Imagify by WP Rocket. This does require a sign up but the free option includes 25MB (they estimate about 250 images) so should cover most users needs. The settings are very self explanatory but one thing worth noting is that the compression level kind of looks like an advertisement so can easily be missed if you don’t know to look for it;
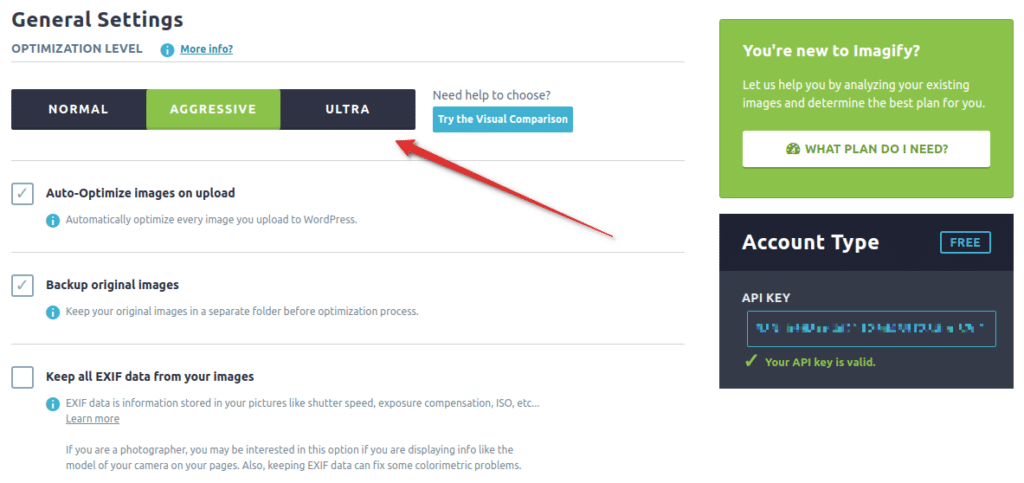
Like Jetpacks Image Accelerator, Imagify also supports WebP but this must be toggled on from the plugin settings!
Lazy Loading
The last technique worth noting when it comes to Image Optimisation, is Lazy Loading. This technique delays an image element being loaded until it is actually visible in the viewport and so reduces the initial load time for a visitor. As mentioned previously, this feature exists in Jetpack’s Site Accelerator feature and can also be achieved with plugins like LazyLoad by WP Rocket or a3 Lazy Load
CSS/JS/HTML Minification
Minification is an oft overlooked step in the optimisation process. In effect, all it means is reducing the size of your static files, which in the case of WordPress is the CSS, JS, and HTML files. The way it does this is both incredibly simple and twofold.
The first technique used in minification is removing all the unnecessary parts of the file such as comments and white space. For example, here’s a snippet of CSS code which has not been minified:
/* Applies to the entire body of the HTML document (except where overridden by more specific
selectors). */
body {
  margin: 25px;
  background-color: rgb(240,240,240);
  font-family: arial, sans-serif;
  font-size: 14px;
}
If we remove the unnecessary elements such as the comment, the line breaks and the white space we’re left with something like:
body{margin:25px;background-color:rgb(240,240,240);font-family:arial,sans-serif;font-size:14px;}While this is definitely less human readable, most users do not interact with their static files directly so it readability isn’t something they should actually care about it. The minified snippet does, however, contain far less data and so will load much faster.
The second technique used in minification is file combination. This does exactly what it says on the tin and just combines files of the same type into one element which reduces the overall number of HTTP requests.
Plugins
Jetpack’s CDN which I spoke about earlier does include static files but unfortunately, it will only works for assets from WordPress Core, WooCommerce and Jetpack so I like to use Autoptimize for my minification needs. I’ve never varied from the default settings so I won’t go into detail about the options available but I will say that I’ve never needed any of the paid features either, so unless you’re certain you do need them, save your money.
Another plugin I regularly use when it comes to my static files is Async JavaScript which allows me to defer the parsing of JS files specifically. All this means is that the content of my site (the images and text for example) will load before the JS scripts. This improves my TTFB but it’s important to note that some themes rely on JS to render this content so this can have a detrimental effect in some cases!
Caching
Caching is the most common method of optimisation but there are usually a few adjustments which can be made to make sure it’s working correctly. Firstly, make sure that your hosting provider is not already providing caching with your product. If they are, look for articles in their knowledge base to ensure you’re not going to be creating a conflict by installing a plugin that does the same thing. If they’re not though, absolutely install a plugin! As with every non native feature in WordPress, you’re going to get a different recommendation based on who you talk to.
My two favourites are Cache Enabler and WP Super Cache, both of which are free.
NOTE: I have always heard good things about WP Rocket, but as it’s a paid solution and I prefer open source options, it’s not something I have any intention of investigating further.
Cache Enabler
Cache Enabler is a remarkably straightforward caching solution that works very well out of the box. It has a fantastically stripped back settings menu with very little need for tweaking;
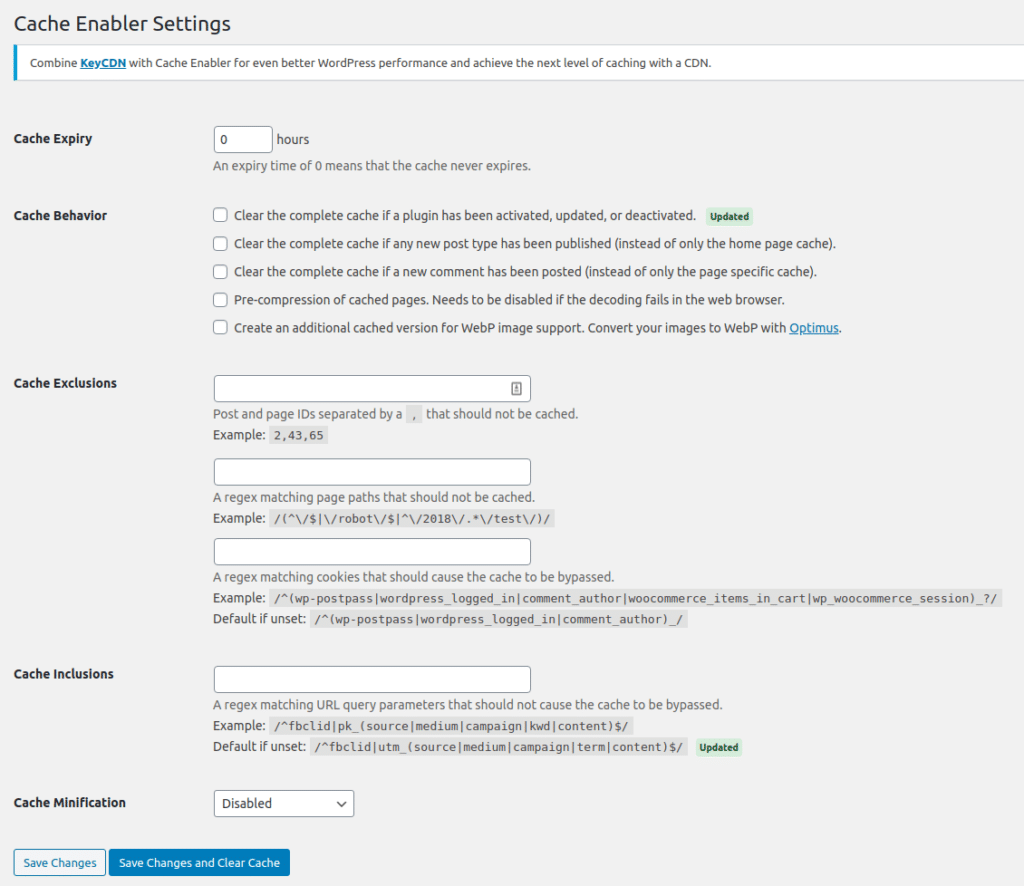
These default settings will work just fine for most users but I can imagine that some may wish to exclude certain pages or posts that include payment gateways or login portals, etc.
WP Super Cache
I’m a big fan of WP Super Cache but I appreciate that there are definitely a lot of options involved when it comes to configuring it correctly. As such, I have a stand alone guide prepared here to go into a bit more detail!
WP-Cron
WordPress includes a scheduling function called WP Cron which is used by an array of plugins. Some of the most common types of events are intended to go unnoticed, for example a plugin might have a weekly cron setup to delete it’s transients, or check it’s own version control if it’s not available on the WordPress Codex. Other scheduled events are much more obvious, like scheduled backups or scheduled posts.
These scheduled events can cause performance issues if ran at inopportune times however. For example, let’s say you run a very image heavy site that hovers around the 20GB mark and has a regular update every Wednesday. You have a backup plugin which creates an archive of your the whole site just in case the worst happens. This backup has to compress and save 20GB of data and if the WP Cron event which executes it also happens every Wednesday evening just after your weekly update, your visitors are going to have a less than ideal experience. To combat this, all you need to do is move that scheduled event to an off peak time like 05:00 on a Saturday or whenever you deem necessary!
In the above example, there’s a high probability that your backup plugin will let you do this in it’s settings menu but for most events, this may not be the case. Enter WP Crontrol. This nifty little plugin will allow you to not only add or remove events, but also create a brand new schedule for them or execute them in real time if you so choose.
Each time a page is loaded, this triggers WordPress to check it’s schedule and make sure no events need to be executed. On particularly busy sites, this means that WordPress is continually checking it’s schedule and this too can lead to performance issues. Luckily, it’s possible to disable the schedule check completely and create your own using a system cron instead which I’ve outlined in another article which can be found here!
Database Optimisation
Optimising a WordPress database is a task unto itself and while there are a few band-aid solutions which will make the alerts go away, but band-aid solutions aren’t really my jam. For a more long term solution I’ve written a guide here to take you through the process start to finish.
Traffic Control
Sometimes, when optimising a website, you can’t find any reason why the performance has changed, all your avenues of optimisation are covered, there have been no changes to the site content and still, somehow, your homepage is loading 1.5s slower than it did two months ago. When this happens, it’s pertinent to check the HTTP requests hitting your server. Where you find this data depends entirely on your hosting provider but it’s almost always called access_log or access.log in my experience. It’s also important to note that checking an analytics plugin is not a reliable alternative for reading the raw logs, as they parse the data according to their own definitions of what a “unique visitor” is. You can get creative with CLI commands to list the “big-hitters” when it comes to your traffic with something like awk '{print $1}' /path/to/your/access.log | sort | uniq -c |sort -n to count the number of times each IP has hit your site, use a whois lookup to investigate where the IP is coming from and what it might be doing, and from there, assess any required action.
Controlling Bots and Crawlers
Ranking well in search engine results is usually a critical factor to any websites success but it’s also important to limit how often these bots or crawlers are indexing your site as many of them can be very aggressive. This is done by creating a robots.txt file placed in the domain directory which these crawlers look for and adding the following snippet;
User-agent: *
Crawl-Delay: 10
This doesn’t prevent the crawlers from executing their index, it basically just tells them to “Heyyyy slow down there buddy, wait 10 seconds between each HTTP request instead of sending them all at once, yeah?” The problem with robots.txt though is that it’s not respected by all bots sadly so in some cases, you may need to block them.
Blocking Traffic
If the big-hitters don’t belong to a known bot or crawler, and aren’t from your own network or that of a known third party service you’re using (like a backup plugin or CDN) it’s time to think about blocking them altogether to increase the site performance for legitimate users.
If your site is hosted on an apache webserver, you can add the following simple directive to the .htaccess file in the domain directory to block the traffic from a specific IP;
deny from $IPThere’s a lot more to to allow, deny directives which aren’t relevant to this document but if you’d like to read more, please do check out this article.
If however, your site is hosted on an nginx webserver, there won’t be a .htaccess file unfortunately so you’ll have to first located your nginx .conf file which differs depending on your host and then add the following snippet there (or ideally, ask your host to create a local .conf file for your domain in case you need to make changes again in the future!);
location / {
   deny $IP;
 }
Limiting /wp-admin/admin-ajax.php Calls
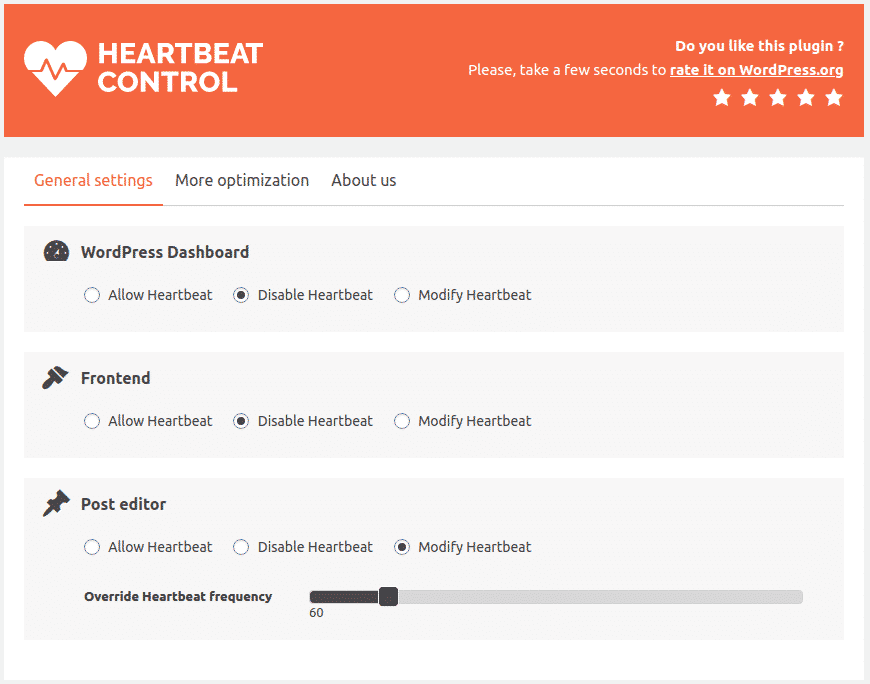
When investigating your traffic, you may see an unusually high number of HTTP requests directed at one file; /wp-admin/admin-ajax.php. The admin-ajax is known as the wp-admin heartbeat and effectively, all it does is pulse every 15 seconds to keep the connection between the browser and the server alive. This serves the purpose of allowing for smooth autosaves, preventing the admin user getting timed out, or third party plugin functions running in the background. When it pulses though, it loads the entirety of the /wp-admin page which can spike the resource usage on the server. It’s possible to see uses of the admin-ajax.php on the public facing side of the site as well, and in these cases, it is most certainly a theme or plugin function (usually a plugin) so it is pertinent to start toggling plugins in a staging environment to fnd the culprit. Either way however, you can limit the frequency of this function with a plugin named Heartbeat Control. With this plugin, you can disable the admin-ajax calls on the public facing and /wp-admin pages along with modifying the post editor frequency which limits your autosave time to your liking (I stick with once a minute personally.)
Use a CDN
Using a CDN can often be one of the greatest improvements to your site’s performance, particularly if it’s quite well optimised in other areas. Personally, I use Cloudflare as it’s completely free and remarkably easy to set up. For the most up to date process, you should check out Cloudflare’s documentation but the long and short of it is basically, sign up for an account and click “Add Website”
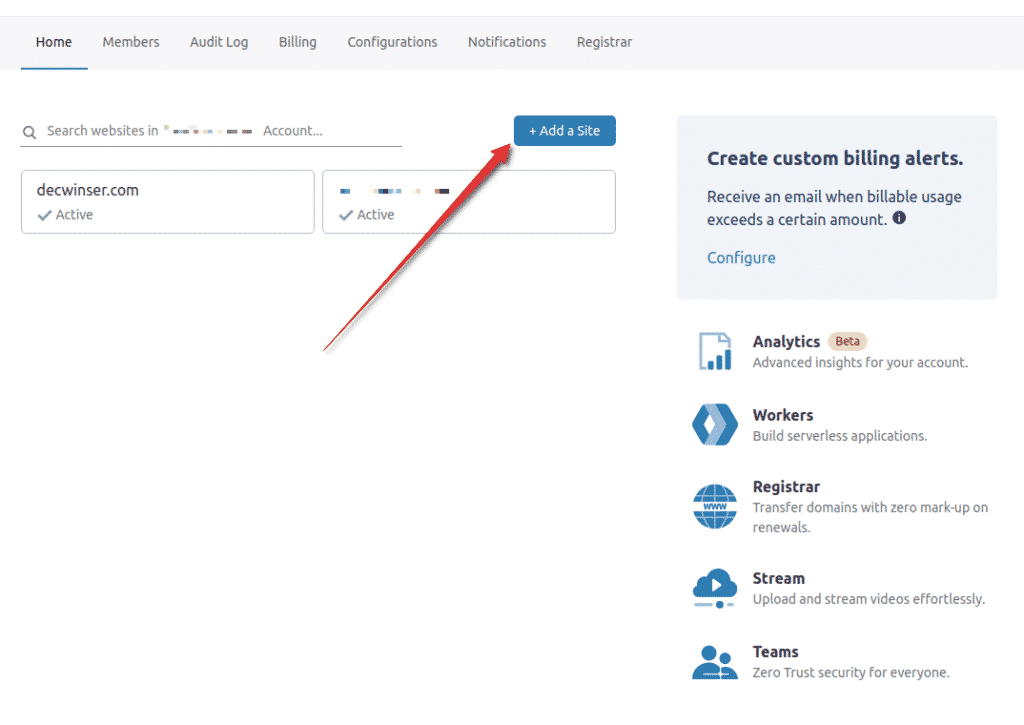
As part of the process, Cloudflare will look up the current DNS records of the site, import them into it’s own zonefile and then provide you with the NS records you need to update at your registrar and you’re all set from there! IF you’d like to read more about how to use Cloudlfare, I have an article prepared here.
My Site is Still Performing Poorly!
If, after following all of the above steps, you still need to get more performance out of your site, you’re in paid solution territory. The first thing I always recommend is taking one more look at your plugins and theme and testing performance with a more native install. If you absolutely cannot remove additional plugins or activate a better performing theme, then you essentially have two options.
The first one is going for a paid optimisation solution. This method is best suited for users who are not expecting any crazy growth or may simply need to have someone get the site off to the right for them. This isn’t something I’ve ever availed off personally, and since I work for a Web Hosting company, I’m not going to offer any biased advice but if you’re host does not have a paid solution, look for third party optimisation services or freelance web developers to get the job done. Be very mindful though, that these kinds of services are almost always one-offs, so if, in six months, the site is under performing again, you will need another payout.
The second option is to upgrade your hosting plan. This is particularly pertinent if you’re on a shared hosting plan or a lower tiered premium hosting plan but in effect, you’re simply increasing the server resources to handle the site more efficiently. This method is most suited for users who have seen or are expecting to see a growth in site traffic and use. In these cases, the site can be optimised to it’s peak but if it’s hosted on a machine with 512MB of RAM, it will never performs as well as it could on a machine with 2GB of RAM.
In Conclusion
Optimisation can be scary and daunting if you have never done it before. Hopefully though, this article can arm you for the task and if it can’t you at least have a path forward in terms of where to look next! The web is constantly evolving and what we consider a quick loading time today may be out the window tomorrow. My goal is to keep this particular article as up to date as possible but I have family commitments and a full time job so if you come across anything here that is out of date or doesn’t make sense, please feel free to add a comment below to bring it to my attention and I’ll address it as soon as possible.
